Managing Purchases in Coreloops
Overview
Coreloops enables you to process all of your purchases and update your cost reports and accounting system in one workflow. You can upload documents into Coreloops directly or forward them in via email.
You can upload any type of purchase document into Coreloops including quotes, purchase orders, invoices and receipts. Coreloops will automatically process all of the information, including construction-specific fields like retention, CIS deductions, etc, in the document and pull this into the platform. This can then be used to update your cost reports and sync these purchases to Xero with all the data pre-filled.
Uploading purchases into Coreloops directly
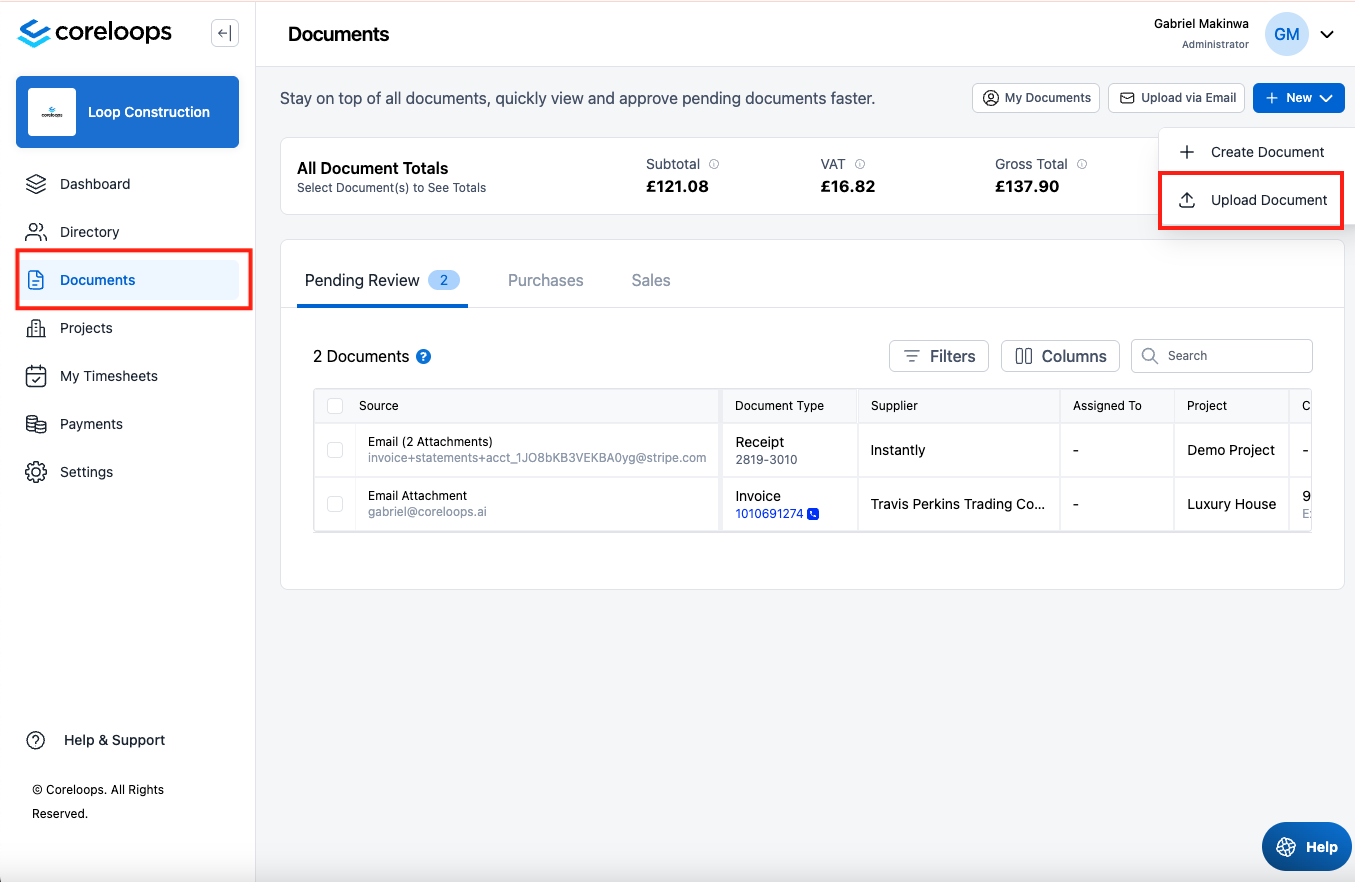
- Head over to the Documents tab by clicking Documents in the main menu on the left-hand side.
- Click on New and then Upload document
- Upload your document by dragging it into the upload box or selecting the files you'd like to upload.
- Once uploaded you'll see the document status will show up as processing. The system takes between 1 - 5 minutes to process a document so go grab a coffee and come back in a few minutes.
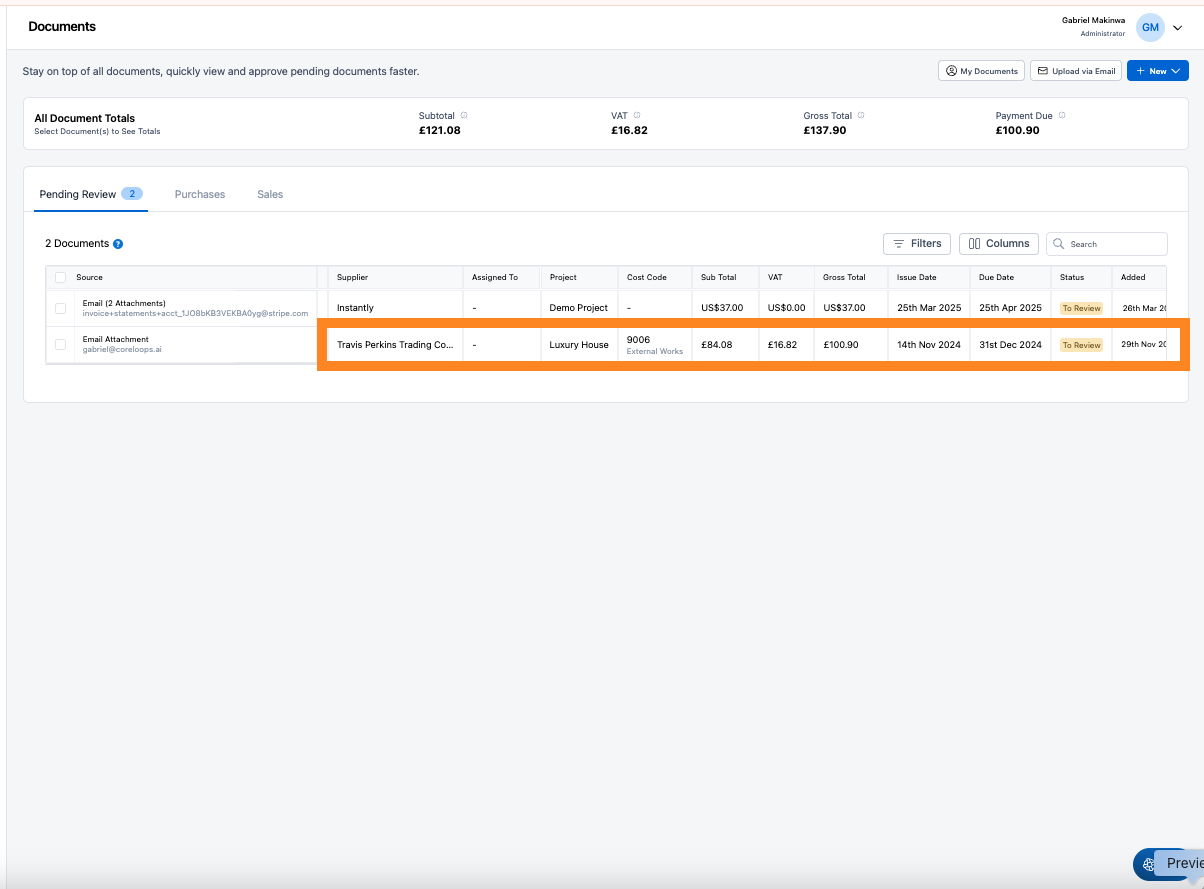
- Once it is processed the status will update to "To Review" andyou'll see the supplier name, document type and the financial data like subtotal, tax amount and gross total. You can then click into review in order to see the details and approve this document.
Forward purchase documents by email
You may receive invoices from your suppliers via email. Instead of downloading them and then uploading it into Coreloops you can simply forward documents into Coreloops from your email provider.
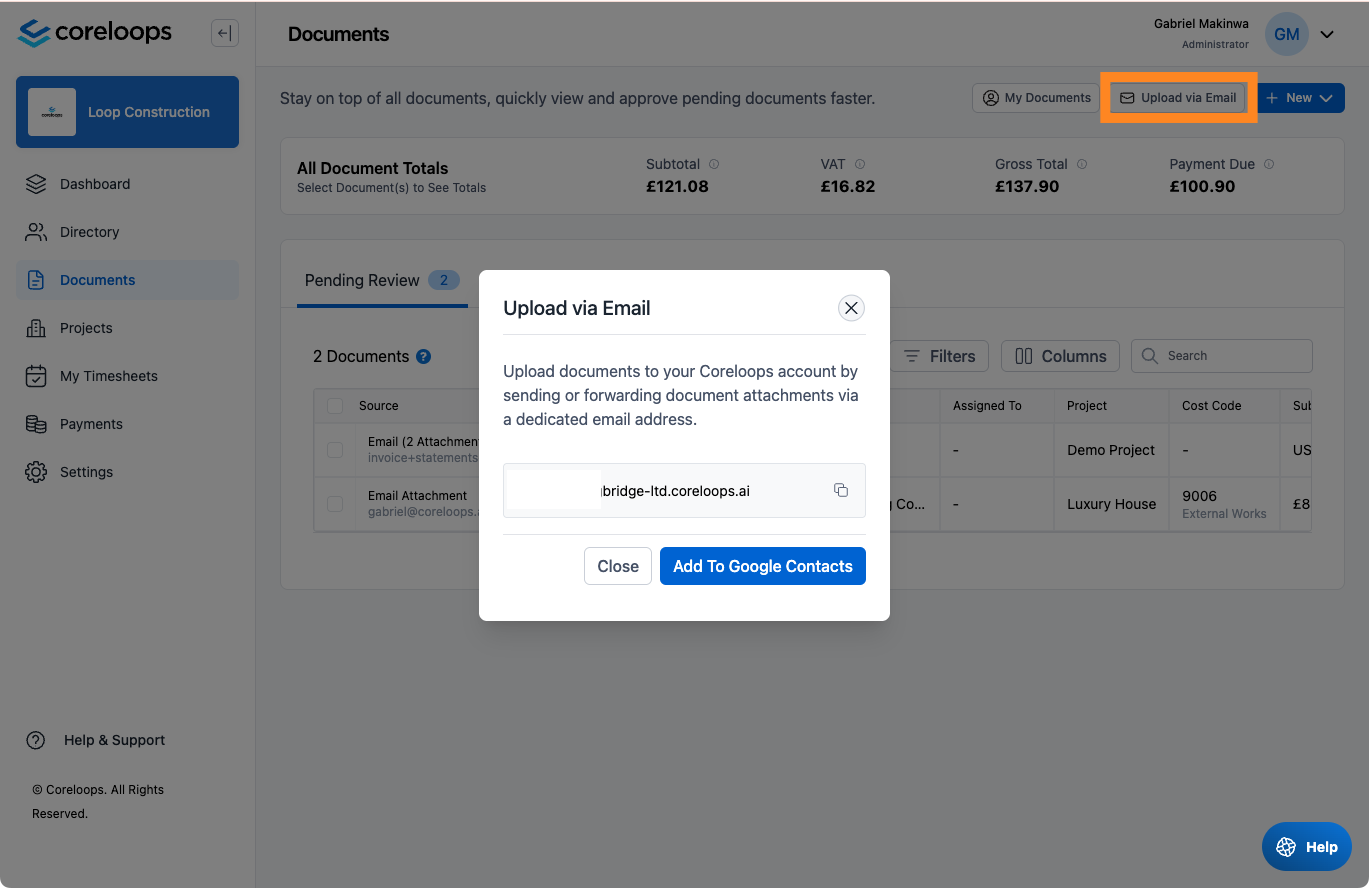
Each company has a dedicated email address that you can access by clicking on upload via email in the right hand corner.
- Click on Upload via email and copy the email address. We advise saving this email address as a contact in your email provider to avoid copying it each time.
- Send or forward any purchase document (quote, purchase order, receipt or invoice) into Coreloops and it will show up in the Pending Review que a few seconds later.
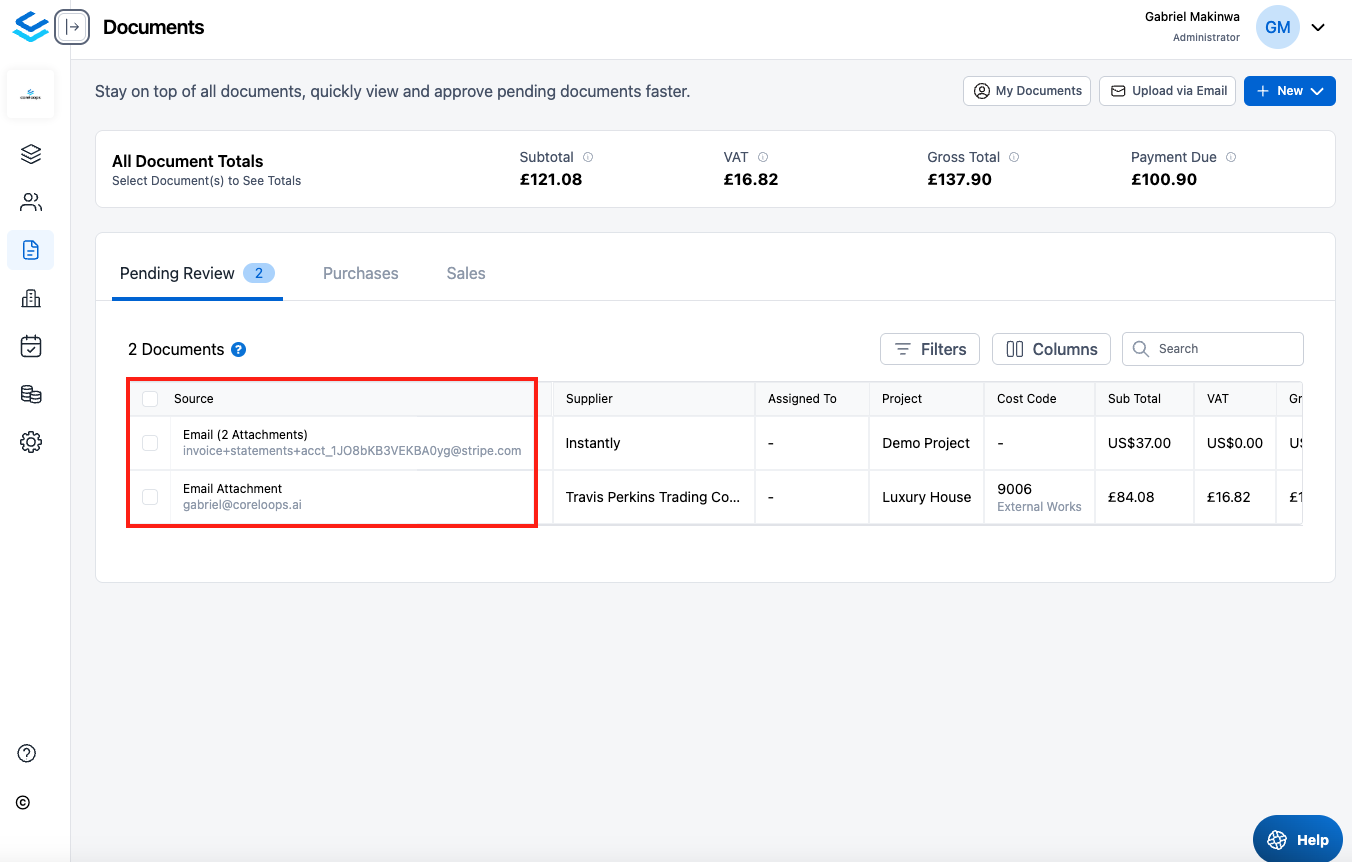
You can see the source of documents sent into Coreloops in the source column.
- Email attachment: means the document being processed was an attachment to the email.
- Email: This is the actual email body. We process this to as it may contain financial information e.g. ecommerce or online receipts.
Reviewing Documents
When you click into a document that is ready to review you will see the document you've uploaded on the right hand side and all of the information that has been pulled from the document on the left.
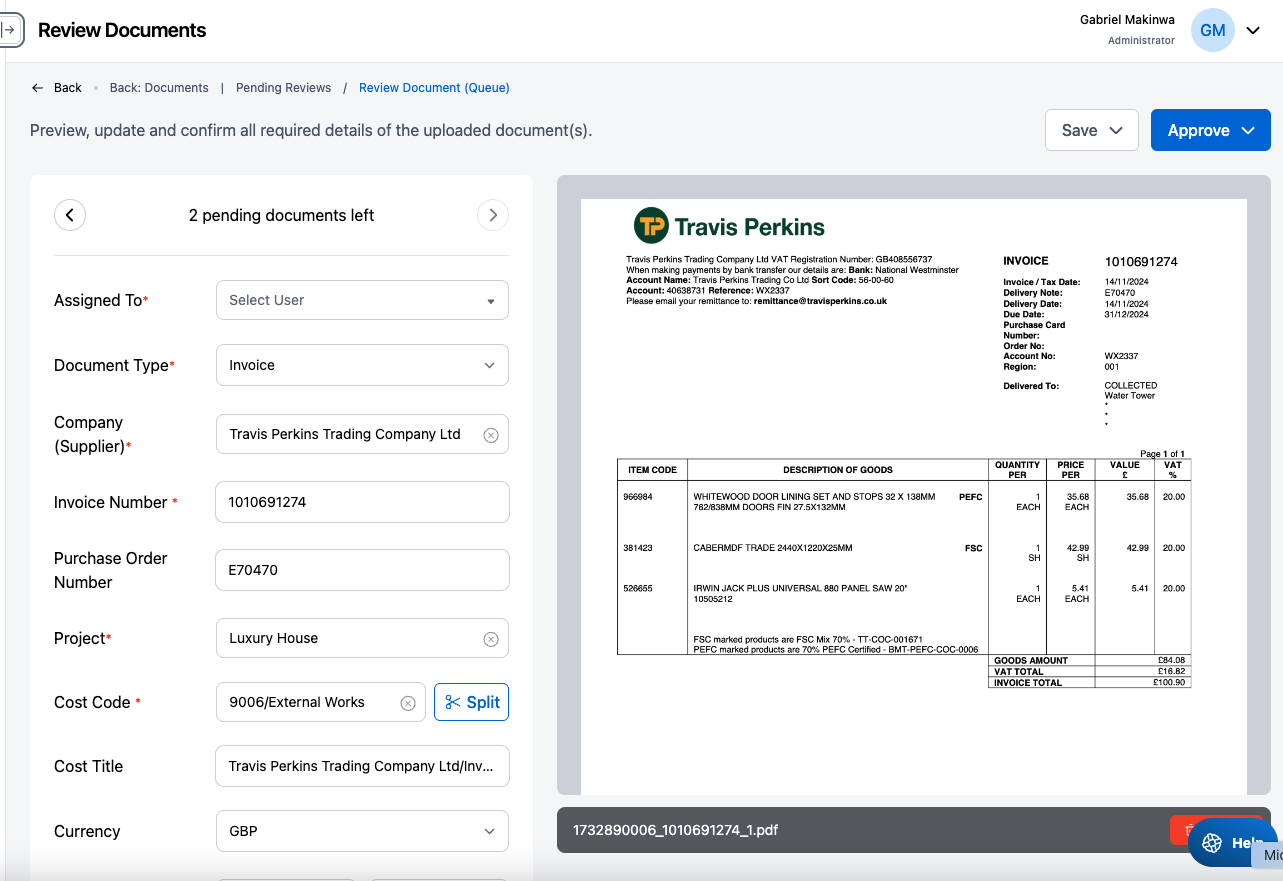
You can configure or update any of these fields below.
| Field name | Description |
|---|---|
| Assigned to | You can assign a document to another team member. They will receive an email asking them to review and approve the invoice. |
| Document Type | The platform will try to determine the document type while it is being processed. The document type, e.g. quote, PO or Invoice, will determine what fields will show below. You can update this if the document type is incorrect. |
| Supplier | This is the supplier identified on the document. You can update the supplier or create a new one. If the system identifies this as a supplier that is not currently in the system |
| Document No. | The Invoice ID, PO number or Quote number identified from the document |
| Purchase Order Number | The PO number is identified from the document. If the invoice doesn't have a PO number or hasn't been identified correctly, you can update this directly. When the PO number is matched to a PO in the system, it will update the project and cost code to match that of the PO or highlight that there are multiple cost codes. |
| Project | This is the project that the invoice has been assigned to. This can be assigned manually or by entering the project ID in the email subject. You can also split the document and assign different parts (amounts) to different cost codes by clicking the split icon. |
| Cost Code | This is the cost code that the invoice has been assigned to. This can be assigned manually or by entering the cost code ID in the email subject. You can also split the document and assign different parts (amounts) to different cost codes by clicking the split icon. |
| Cost Title | This is a title created to make it easier to identify the document. It is defaulted to supplier name/document type/issue date |
| Currency | This is the currency that has been identified from the document. If this is incorrect it can be updated manually. |
| Issue/Due date | The date the document was issued and the date it is due to be paid. |
| Subtotal | This is typically the amount before taxes, and therefore, this is the actual amount paid for the goods, services or work. This is the value that will be used to update your cost report once the document is approved. |
| Retention | If there is any retention stated on the invoice then this will be pulled into this field. |
| VAT Amount | If there is any VAT stated on the document then this will be pulled in here. |
| Discount Amount | If there is any total discount stated on the invoice then this will be pulled into this field. |
| CIS Amount | If there is any CIS stated on the invoice then this will be pulled into this field |
| Total | This is the total amount due on this document. It should typically include the sum of Subtotal + (CIS,VAT). However some suppliers may structure their invoices differently. |
| Total Paid | If any payments are listed on the invoice, this is listed here. You can add payments that have been made manually by clicking add payment. Simply add the amount paid and the date of payment. If the whole invoice has been paid you can simply "Approve and Mark as Paid" from the approve button above. |
| Net Amount Due | This is the amount still due for payment. This is typically the Total Due - (CIS, Retention & Total Paid). |
| Notes | These are notes that you can add for your team members to see or as a reminder to yourself about this invoice. |
Once you've reviewed the document you can save or approve the document. Approving will update the actual ordered (purchase orders) or actual costs (invoices or receipts) column in your project cost report.
Splitting documents
You can split and allocate different parts of a purchase to different projects and cost codes. Simply click on the split button beside the cost code field and you will be able to add a project and cost code for each line item that the document has pulled.
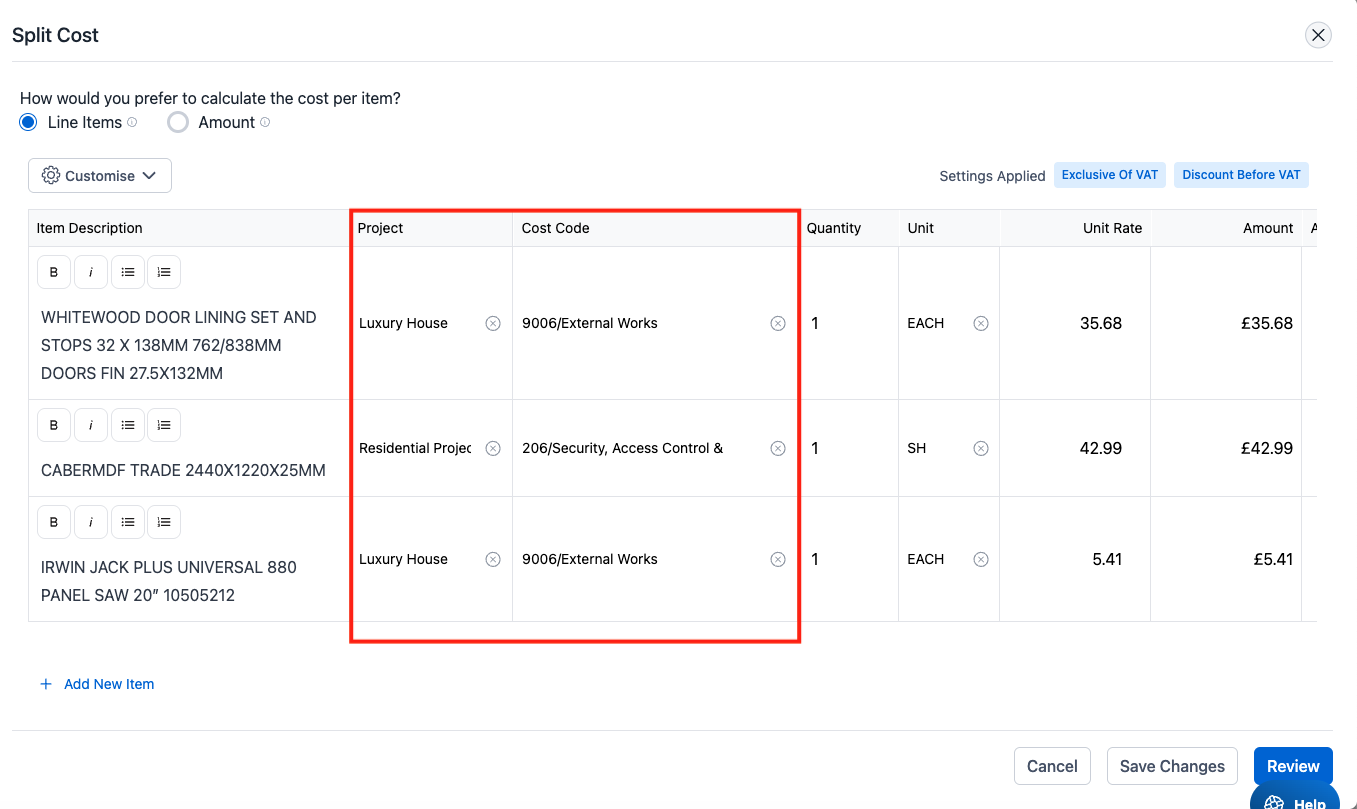
This will update the actual costs in each project's cost report with the actual value of the line items attached to it.
